
C# – Colour Spaces
Colour can do anything that black and white can
Vincente Minnelli
In this post, I’m going to discuss an alternative to the standard red / green / blue colour space, and how we can make use if it in a WPF application.
I recently worked on an application that managed a food production line, using thermal cameras to check that the items were correctly packaged. I’m not going to discuss the actual image analysis API in this post, just focus on one requirement from the application. As part of the user interface, my client wanted the output from the camera to be displayed as a “thermal” image. You’ve probably come across this type of image – using different colours to represent variations in temperature.

My task was to take the processed output from the camera (RawImage) – a two dimensional array of ushort values, which corresponds to the temperature for each pixel, and produce a suitable image object for display. In this case, the variation in minimum and maximum temperature values between different images is relatively small, and the images are only for general reference rather than any calculation, so it’s not required to use a specific colour to represent a particular temperature value. This means that the image generation process can be simplified – use dark blue (RGB #000050) for the minimum (coldest) pixel value in each individual RawImage and bright yellow (RGB #FFFFA0) for the maximum (hottest).
My initial analysis led me to think that would be a pretty straightforward algorithm – just generate the colour for each pixel by calculating it’s proportional position between T-Min and T-Max, and then use linear interpolation of the individual red / green / blue channels between the min-colour and the max-colour. The output from that methodology is shown below.
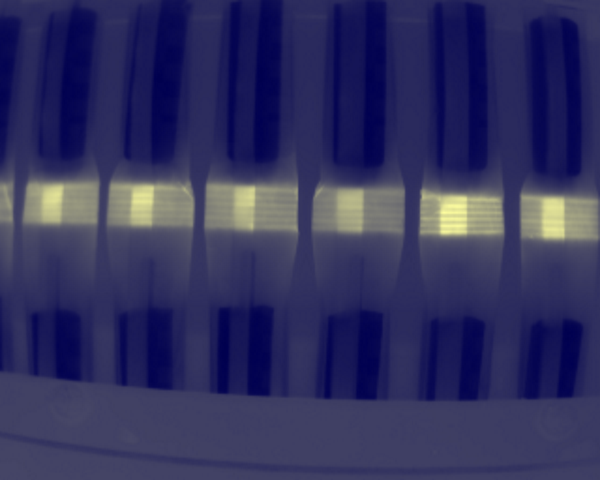
Very disappointing to say the least ☹.
Think about it logically though – why would a linear transition from blue to yellow go via pure red? We could improve the output by adding a number of colour stops – as with a LinearGradientBrush, but this soon loses flexibility.
The solution came from considering the colour space that I was using. RGB is fine for defining an individual static colour value, but it’s not at all intuitive what colour you’re going to get if you adjust one of the red / green / blue channel values. There are a number of alternative colour spaces available, but many of these are designed for photographic or print media use, and the mapping between those and a corresponding RGB value (which we’re ultimately going to need to produce an image display object) is far from straightforward. However, the HSL colour space is good enough for these requirements.
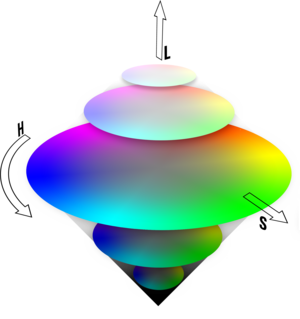
A HSL colour value consists of three elements.
- Hue – this is what we might usually think of as the “colour”. Hue is a colour wheel, with values specified as an angle 0..360° (or in some implementations as a number 0 .. 6)
- Saturation – how “intense” the colour is, from 0 (grey) to 1 (full colour intensity)
- Luminosity (or Lightness) – the brightness of the colour, from 0 (black) to 1 (white). A value of 0.5 produces the “pure” colour
In the library, I’ve created my own RGB colour class (allowing these routines to be used by both WPF and Winforms applications) and another for HSL. perColorConverter handles the conversion between these two colour classes. I’ve included an alpha channel (byte value) in my HSL class, but the conversion to / from RGB just treats that as a direct 1:1 mapping.
The output from the HSL based algorithm is shown below – that’s more like it 😀.
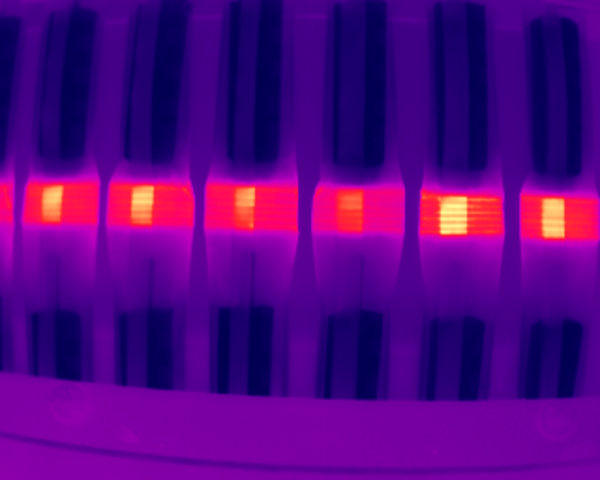
Note that as we want the hue values to go around the colour circle from blue to yellow via magenta & red rather than green, we need to force this by adding 360° to the end hue value. ImageConverter can cope with this as it adjusts the input hue value to the range 0..360.
Using the HSL colour space isn’t going to magically produce some new previously unknown colour though. Every HSL value can be mapped to an equivalent RGB value, and vice versa. If you just want to specify a single colour value, you might as well use RGB to specify that. However, two key uses for HSL are
- to find good contrasting colours – hue values 180° or 120° apart are considered to be “visually pleasing”
- as in this requirement, to generate more attractive transitions between two colour values.
There are two demo projects for this post. The first just shows the difference between the outputs from the RGB and HSL variants of the thermal image colourizer.
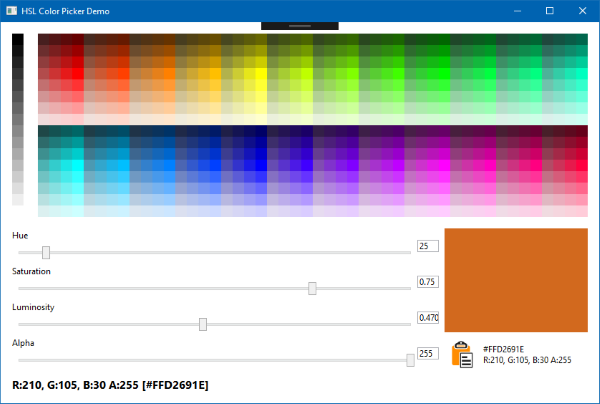
The second is a colour picker control where the “standard” colour values are defined in steps of H / S / L value, with further adjustments to select the exact colour using the slider controls.
As usual the code samples for this blog are available on Github, along with my own personal C# / WPF library.
If you find this article useful, or you have any other feedback, please leave a comment below.
Amazing work! Keep it up.