
MVVM – View
It is easier to go down a hill than up, but the view is from the top.
Arnold Bennett
In this post, I’m going to return to the fundamentals of MVVM – this time looking at the View layer.
The first point is to briefly introduce the base view class – perBaseView. Those of you who have looked at the code for my post on message dialogs will have already come across this – it is the ultimate base class for the dialog window. At present, its control template only sets three properties on the view (which in my opinion should be the default for every view instance created).
<Style
    BasedOn="{StaticResource {x:Type Window}}"
    TargetType="{x:Type vctrl:perViewBase}">
    <Setter Property="TextOptions.TextFormattingMode" Value="Display" />
    <Setter Property="TextOptions.TextRenderingMode" Value="ClearType" />
    <Setter Property="UseLayoutRounding" Value="True" />
</Style>
I’ll expand on this some more in a future post, including a replacement for the entire standard windows chrome.
The main topic I wanted to focus on in this post is how the View and ViewModel layers are linked.
In the previous versions of the StaffManager demo application, I’ve used a couple of different techniques for assigning a ViewModel instance as the DataContext for a View.
Initially, I just assigned the View’s DataContext in the xaml file.
<Window.DataContext>
    <local:MainViewModel />
</Window.DataContext>
However, xaml requires that any class used has a parameterless constructor. Once we started injecting services into the ViewModel via its constructor then this construct is no longer valid.
In later versions, I assigned the DataContext in the C# constructor for the View
public MainView()
{
    DataContext = SimpleIoc.Default.GetInstance<MainViewModel>();
    InitializeComponent();
}
This works fine for run-time, but in the Visual Studio designer all we see is an empty shell with no data. Now, I’m going to introduce a third construct for this DataContext assignment, but now allowing “live” data to be shown even when in design mode.
The ViewModelLocator pattern is another example of a service class …
public class ViewModelLocator
{
    public ViewModelLocator()
    {
        Bootstrapper.Run();
    }

    public MainViewModel MainViewModel
    {
        get
        {
            var result = perIoC.GetInstance<MainViewModel>();

            // no loaded event when in designer mode
            if (perViewModelHelper.IsInDesignMode)
                result.LoadDataCommand.Execute(null);

            return result;
        }
    }
}
… although this time, the service instance is created in App.xaml …
<Application.Resources>
    <local:ViewModelLocator x:Key="ViewModelLocator">
</Application.Resources>
… which makes it available available as an application-wide resource.
Now we can fetch an instance of a particular ViewModel at any time, including inside the designer, and assign it to the View’s DataContext.
<Window
    x:Class="StaffManager.MainView"
    ...
    DataContext="{Binding Source={StaticResource ViewModelLocator}, Path=MainViewModel}" />
The Bootstrapper is still used to define the implementation of the IStaffManagerDataService interface, but now there are different versions for design-time and run-time.
public static class Bootstrapper
{
    public static void Run()
    {
        perWpfViewBootstrapper.Run();

        if (perViewModelHelper.IsInDesignMode)
            perIoC.RegisterImplementation<IStaffManagerDataService, StaffManagerDataServiceMock>();
        else
            perIoC.RegisterImplementation<IStaffManagerDataService, StaffManagerDataService>();

        perIoC.RegisterType<MainViewModel>();
    }
}
Note that there are no events fired when in design mode, so we have to manually kick off the load data command inside the ViewModelLocator when fetching a MainViewModel instance.
So now, once the application is built in Visual Studio, open up MainView.xaml in design mode, and lo and behold – the controls are populated with data.
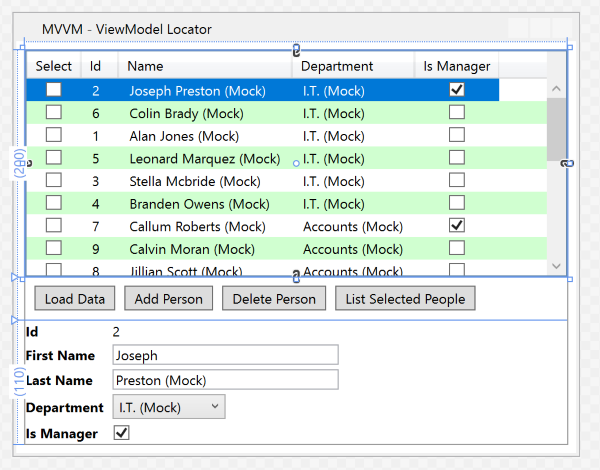
Of course, you can’t interact with the controls in the designer in the same way as when the application is running, but it is still useful to check that data-bindings are working as desired and that you’ve allowed sufficient space for the data in each control.
This design pattern might feel like overkill for a simple one form application, but as the application grows in complexity with many View classes, then the benefits of having all similar and related code in one place will become clearer.
One other thing to mention about this version of the Staff Manager application. Continuing with the clean code theme, the IoC container (currently MVVMLight’s SimpleIoC) has been abstracted out into a single point of reference (perIoC) rather than being scattered throughout the code. Now if we ever want to swap to a different implementation of this functionality then all the changes can be done in one place.
This was the last piece of the MVVM jigsaw. In the next post I’ll bring the StaffManager demo together into one complete application.
As usual the code samples for this blog are available on Github, along with my own personal C# / WPF library.
If you find this article useful, or you have any other feedback, please leave a comment below.